soma-template
Seamless DOM-based templates.
soma-template is a web template engine.
A web template engine is a solution that is used to process web templates and content to produce an HTML output.
While this is true for the most common web template engine, soma-template differs about the output process. soma-template will also produce an HTML output, but more precisely, will manipulate DOM nodes rather than producing a "template string" that will be injected into the DOM.
This results in a workflow that stays close to a normal HTML development as the template can be directly part of the DOM itself.
The library aims to reduce as much as possible DOM node destruction.
soma-template is lightweight : 6.8 KB. It is tested and works in all modern browsers and in Internet Explorer from version 7 to 10. Its performance will be directly related to the DOM manipulation performance of the browser itself. This is why today the library is very fast on Google Chrome, which I recommend.
Browser
You can also download a zip file containing everything. Finally, add the script to your page:
<script type="text/javascript" src="soma-template.js"></script>
Node.js
$ npm install soma-template
var template = require("soma-template");
A template is a DOM element that contains tokens, and these tokens will be replaced by data provided to the template. Here is an example:
<div id="template">
  <p>My name is {{name}}.</p>
</div>
A token is an identifier surrounded by double curly braces (customizable). In this example "name" is the identifier and the template engine will try to find data to replace the token in the DOM element.
There are four ways to create a template.
This is the easiest way, and the one I recommend. The template is part of the DOM and a reference to it can be sent to the create function. A template instance will be returned, this is what will be used to render data inside it.
Note that the tokens will appear in the DOM but the template engine provide a way to easily hide elements (such as the template itself) until the template is rendered. See the class name "data-cloak".
<div id="target"><p>My name is {{name}}.</p></div>
<script type="text/javascript">
  var target = document.getElementById("target");
  var template = soma.template.create(target);
</script>
An automated template creation can be performed using a data-template attribute. The value of the attribute will be a reference to a function callback (namespace supported). This method will receive the template as a parameter, the scope and the DOM element as a shortcut.
<div data-template="Template">{{name}}</div>
<script>
  function Template(template, scope, element, node) {
    scope.name = "john";
    template.render();
  }
</script>
Instead of using an element directly, you can also send a string that represents the template. The template engine will inject the string as a real element inside the DOM, this is why you also need to specify an element target when you use a string template.
Note that even if you create a template using a string, rendering data inside the template will be done in the same manner: using native DOM manipulation. More specifically, the DOM property innerHTML is never used to render a template in soma-template.
<div id="target"></div>
<script type="text/javascript">
  var templateString = '<p>My name is {{name}}.</p>';
  var target = document.getElementById("target");
  var template = soma.template.create(templateString, target);
</script>
This method is similar to other template engines. Elements can be surrounded by script tags and to be injected in the DOM. There is no major advantage using this method as the template will inject it in the DOM as soon as you create the template instance. However this makes you able to compile it at a chosen moment and before that, it will never appear in the DOM.
<div id="target"></div>
<script id="source" type="text/x-soma-template">
  <p>{{name}}</p>
</script>
<script type="text/javascript">
  var source = document.getElementById("source");
  var target = document.getElementById("target");
  var template = soma.template.create(source, target);
</script>
Rendering a template is the action of sending data inside the template so it can find information to replace the tokens.
This part will be much different than other template engines. The JSON format can of course still be used, but the way that it is sent to the template is different.
The template instance is providing a property called scope. There is at least one scope per template, which is nothing more than an object with some special properties for the template engine.
There can be more than one scope in some cases, see the special attribute data-repeat. The scope is the object that will be used to provide the data. In other words, the data is not sent to the template but assigned to the scope in a very easy and natural manner.
The template engine will also re-render the elements only if the data has changed.
Here is an example where a value is provided for an identifier named "name" (to keep the code short and simple, a template variable is used to refer to a template instance, see previous examples).
<div id="target"><p>My name is {{name}} and my age is {{age}}.</p></div>
<script type="text/javascript">
  template.scope.name = "John";
  template.scope.age = 21;
  template.render();
</script>
This will result in the following:
<div id="target"><p>My name is John and my age is 21.</p></div>
Another example with data received from an API call. The response can simply be assigned to a scope property and accessed using dot notation.
<div id="target">
  <p>{{tweets.results.length}} tweets retrieved
  in {{tweets.completed_in}} seconds.</p>
</div>
<script>
  $.ajax({
    type:'GET',
	url: 'http://search.twitter.com/search.json?q=template',
	  dataType:'jsonp',
	  success:function (data) {
	    template.scope.tweets = data;
	    template.render();
	  }
  });
</script>
In some cases, it is useful to render strings that contains html nodes.
See the special attributes data-html.
A String interpolation makes heavy use of string representation of data. It means insert a string or replace a variable with its value making string formatting very intuitive.
You can add tokens in text nodes, but you can also use them in attribute names and values. In the following example, a class value is rendered, as well as the attribute name:
<div id="target">
  <p {{name}}="{{value}}">The class used is: {{value}}</p>
</div>
<script>
  template.scope.name = "class";
  template.scope.value = "color";
  template.render();
</script>
You can use tokens in anything, but also anywhere, even in the middle of other strings.
<div id="target">
  <p cla{{name}}="{{value}}lor">
    Ren{{text1}}er any{{text2}}ng an{{text3}}re
  </p>
</div>
<script>
  template.scope.name = "ss";
  template.scope.value = "co";
  template.scope.text1 = "d";
  template.scope.text2 = "thi";
  template.scope.text3 = "ywhe";
  template.render();
</script>
A path, or dot notation, can be used in the token to access to specific data:
<div id="target">
  <p>My name is {{section.person.name}}
  and my age is {{section.person.age}}.</p>
</div>
<script>
template.scope.section = {
  person: {
    name: "John",
    age: 21
  }
};
template.render();
</script>
The values of an array can be accessed using a standard Javascript syntax:
<div id="target">
  <p>two people: {{person[0][0]}} + {{person[0][1]}}</p>
  <p>other people: {{person[1][0]}} + {{person[1][1]}}</p>
  <p>grouped: {{getAll(person)}}</p>
</div>
<script>
  template.scope.person = [
    ['john', 'david'],
    ['olivia', 'emily']
  ];
  template.scope.getAll = function(arr) {
    return arr.toString();
  }
  template.render();
</script>
Functions can also be called from the token, the value returned by the function will replace the token:
<div id="target"><p>My name is {{getName()}}.</p></div>
<script>
  template.scope.getName = function() {
    return "John";
  };
  template.render();
</script>
Parameters can be sent with a function call. They can be of two types: a string or a reference to another property in the scope:
<div id="target"><p>I am {{getAge("21", years)}}.</p></div>
<script>
  template.scope.years = "years old",
  template.scope.getAge = function(age, type) {
    return age + " " + type;
  };
  template.render();
</script>
Paths, strings, functions, parameters, text node, attribute names and values, everything can be mixed altogether:
<div id="target">
  <p class="bold {{styles.color}}">
    I am {{utils.makeOlder(person.age, "years old")}}.
  </p>
  </div>
  <script>
  template.scope.styles = {
    color: "color"
  };
  template.scope.person = {
    age: 21
  };
  template.scope.utils = {
    makeOlder: function(age, type) {
      return (age*2) + " " + type;
    }
  };
  template.render();
</script>
A repeater is a special attribute (data-repeat) that will duplicate the current node. A repeater can be used to perform an iteration on an array or an object to display its content.
The repeater attribute value is composed of three parts: a "current variable" that you can name as your convenience, the keyword "in" and the array or object target: "my_var in my_array".
A scope will be created for each repeated node to avoid data conflict, and will have a reference to its parent. The template engine will automatically search in its scope parent in case it doesn't find data in its current scope.
Here is an example of an array repeater, an $index variable is also available on the current scope and can be passed to a function if needed.
The node that contains the data-repeat, and everything inside, will be duplicated three times in this example. One for each item in the array items.
<div id="target">
  <div data-repeat="item in items">
    <div>{{$index}} - {{greet}} {{item.name}}!</div>
  </div>
</div>
<script>
  template.scope.greet = "Hello";
  template.scope.items = [
    { "name": "John" },
    { "name": "David" },
    { "name": "Mike" }
  ];
  template.render();
</script>
You can also perform an iteration on an object, in this case a $key variable will be available on the current scope.
<div id="target">
  <div data-repeat="item in items">
    <div>{{$key}} - {{greet}} {{item}}!</div>
  </div>
</div>
<script>
  template.scope.greet = "Hello";
  template.scope.items = {
    name1: "John",
    name2: "David",
    name3: "Mike"
  };
  template.render();
</script>
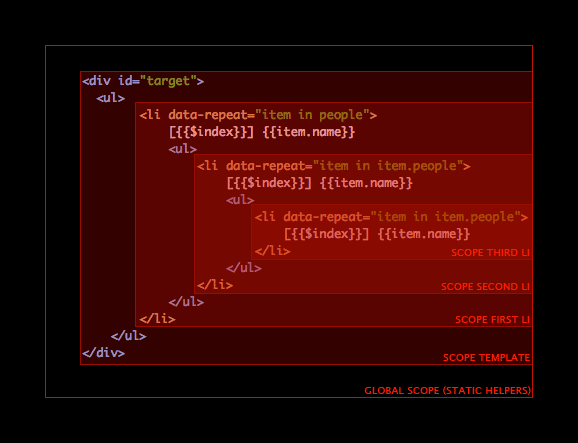
A scope provides a data model context for a template, and a new scope child is created for each item of a repeater to provide a new context and avoid data conflict.
The following image illustrates a template scope that contains a child scope, which contains also another child scope, and so on. Notice that all variables names are identical but the values are probably different.
The global scope that surrounds each template scope is shared between all templates. The global scope can be populated with helper functions or global values (see the helpers section).
Note that a scope parent can also be accessed using a parent path notation (also works with parameters):
{{../item.name}}
{{../../getName(../$index)}}
Events can be added to the template in the form of a function that will be called when the user triggers an interaction with the current DOM element.
The function targeted can be added to the scope and the first parameter will be the event itself, other dynamic parameters from the scope can also be sent to the event handlers.
The template engine supports the most common events, to name a few: click, mouse over, change, keypress, drag, submit and so on. Other events can easily be added, see the settings section.
Click here to see the events demo.
The following demonstrates how to add a click event and a mouse over event:
<div id="target">
  <button data-click="clickHandler()">Click me</button>
  <button data-mouseover="overHandler()">Roll over</button>
</div>
<script>
  template.scope.clickHandler = function(event) {
    alert('The event: "' + event.type + '", has been triggered!')
  }
  template.scope.overHandler = function(event) {
    alert('The event: "' + event.type + '", has been triggered!')
  }
  template.render();
</script>
Events can also be added manually to a node, using the type of the event and the pattern (function and parameters):
<div id="target">
  <button id="ct1" >Click</button>
  <input id="ct2" type="text" value="type something">
</div>
<script>
  var template = soma.template.create(document.getElementById('target'));
  template.scope.handler = function(event) {
    alert('The event: "' + event.type + '", has been triggered!')
  }
  var button = template.getNode(document.getElementById('ct1'));
  var input = template.getNode(document.getElementById('ct2'));
  button.addEvent('click', 'handler()');
  input.addEvent('keypress', 'handler()');
  template.render();
</script>
To remove events (or add them manually), the node instance of the element can be used:
<div id="target">
  <button id="bt1" data-click="clickHandler()">Will work</button>
  <button id="bt2" data-click="clickHandler()">Will not work</button>
</div>
<script>
  var template = soma.template.create(document.getElementById('target'));
  template.scope.clickHandler = function(event) {
    alert('The event: "' + event.type + '", has been triggered!')
  }
  var node = template.getNode(document.getElementById('bt2'));
  node.removeEvent('click');
  template.render();
</script>
The first parameter in the event handlers will always be the event itself, but other parameters can also be sent to the function. This capability makes you able to send whole objects, greatly reducing the amount of code needed to treat the data.
<div id="target">
  <ul>
    <li data-repeat="person in people">
      <button data-click="showAge(person)">Click on {{person.name}}</button>
    </li>
  </ul>
</div>
<script>
  template.scope.people = [
    {name: 'John', age: 21},
    {name: 'David', age: 32}
  ];
  template.scope.showAge = function(event, person) {
    alert('I am ' + person.name + ', and my age is ' + person.age);
  }
  template.render();
</script>
The library also makes possible to parse the DOM and attach event handlers without creating templates. The functions soma.template.parseEvents and soma.template.clearEvents can be used for that purpose.
The first parameter with the element from which you want to start to parse the DOM, the second parameter is the object that contains the handlers, and the third optional parameter is a depth value for the parsing (0 to parse only one element). Parameters from the scope can't be sent using this method as it is not related to a template.
<div id="target">
  <button data-click="handler()">Click me</button>
</div>
<script>
  soma.template.parseEvents(document, this);
  function handler(event) {
    alert('The event: "' + event.type + '", has been triggered!');
  }
</script>
Events can be added and removed manually without template using the soma.template.addEvent and soma.template.removeEvent functions. Parameters from the scope can't be sent using this method as it is not related to a template.
<div id="target">
  <button id ="bt">Click me</button>
</div>
<script>
  soma.template.addEvent(document.getElementById('bt'), 'click', handler);
  function handler(event) {
    alert('The event: "' + event.type + '", has been triggered!');
  }
</script>
Special attributes have already been introduced with the repeaters (data-repeat). The attributes are providing new functionalities or special behaviors for ease-of-use most of the time
All the attribute names are customizable in case you want to change them, it can be useful if one of them are conflicting with something else in your application.
The templates can be created automatically using the data-template attribute. The value must be a function that will be used as a callback (namespace supported).
This is method of creation is a shortcut and is completely optional, only the presence of the attribute triggers the creation, which can also be disabled setting the soma.template.settings.autocreate value to false.
<div data-template="Template">{{name}}</div>
<script>
  function Template(template, scope, element, node) {
    scope.name = "john";
    template.render();
  }
</script>
Paradoxically, data-cloak is not an attribute but a styled class that is used to hide elements before rendering, in other words, to hide tokens. The class itself is not provided by the template but will be automatically removed on rendering.
The class can be set on the root of the template, or on any element inside the template.
<style>
  .data-cloak {
    display: none;
  }
</style>
<div id="target">
  <p>Next line appears after rendering:</p>
  <p class="data-cloak">{{text}}</p>
</div>
<script>
  template.scope.text = "Here I am!";
  template.render();
</script>
The template engine will stop parsing the elements children if it find a data-skip attribute on an element, with no value or a boolean. The value of the attribute can also be a token, only the children will not be parsed. If there are tokens in skipped elements, they won't be replaced.
It can also be useful to skip a large number of elements to keep the best performance possible.
<div id="target">Show my name: {{name}}, but not
my age: <span data-skip="true">{{age}}</span></div>
<script>
  template.scope.name = "John";
  template.scope.age = 21;
  template.render();
</script>
Most of the the time, when a text node is rendered, the DOM API property used is element.nodeValue. Sometimes it is useful to render HTML node. For example the data might be already formatted with HTML nodes inside it (<p>paragraph</p>).
The DOM API property used to render HTML nodes is element.innerHTML. The special attribute data-html can be applied on the parent of the text node to render the HTML nodes.
<div id="target">
  <div data-html="true">{{firstLine}}{{secondLine}}</div>
</div>
<script>
  template.scope.firstLine = 'first line<br/>';
  template.scope.secondLine = 'second line';
  template.render();
</script>
The data-src attribute will produce a src attribute on rendering. The reason for using this attribute is to avoid to give a wrong path to the browser. Using a token in a src attribute, for example the source of an image, would result in a 404 error.
<div id="target"><img data-src="images/{{image}}.jpg"></div>
<script>
  template.scope.image = "image";
  template.render();
</script>
The data-href attribute will produce a href attribute on rendering. The reason for using this attribute is to avoid the user clicking on a non-rendered links. Using a token in a href attribute, for example an a tag, would probably result in a dead link (404 error).
<div id="target">
  <a data-href="http://{{link}}" target="_blank">Clickable when rendered</a>
</div>
<script>
  template.scope.link = "www.soundstep.com";
  template.render();
</script>
While this behavior can be achieved with tokens, this attribute will show or hide elements depending of its value (boolean). It is something close to a switch on and off.
<div id="target">
  <div data-show="{{displayed}}">I am visible!</div>
  <div data-hide="{{displayed}}">I am not :(</div>
</div>
<script>
  template.scope.displayed = true;
  template.render();
</script>
A class can also be added or removed from a node element using the data-class special attribute. Interpolations with properties and functions can also be used.
<style>
  .red {
    color: red;
  }
</style>
<div id="target">
  <div data-class='{"red": true}'>I am red!</div>
  <div data-class='{"red": false}'>I am not red...</div>
</div>
<script>
  template.render();
</script>
A checkbox "initial checked value" is set by the presence or non-presence of the checked attribute. For convenience, the data-checked attribute, which take a boolean, will add or remove the checked attribute.
<div id="target">
  <input type="checkbox" data-checked="{{checked}}"> Checked or unchecked?
</div>
<script>
  template.scope.checked = true;
  template.render();
</script>
An element disabled value is set by its presence or non-presence. For convenience, the data-disabled attribute, which take a boolean, will add or remove the disabled attribute.
<div id="target">
  <input type="text" data-disabled="{{disabled}}" value="Disable me">
</div>
<script>
  template.scope.disabled = true;
  template.render();
</script>
A select multiple value is set by its presence or non-presence. For convenience, the data-multiple attribute, which take a boolean, will add or remove the multiple attribute.
<div id="target">
  <select data-multiple="{{multiple}}">
    <option>United Kingdom</option>
    <option>France</option>
    <option>Germany</option>
  </select>
</div>
<script>
  template.scope.multiple = true;
  template.render();
</script>
An element readonly value is set by its presence or non-presence. For convenience, the data-readonly attribute, which take a boolean, will add or remove the readonly attribute.
<div id="target">
  <input type="text" data-readonly="{{readonly}}" value="Read only?">
</div>
<script>
  template.scope.readonly = true;
  template.render();
</script>
Special variables set by the template engine can be used to access to specific parts of the context, such as the index of a repeater of the HTML Element itself. This is especially useful to send these values as parameter of a function.
The $element variable represents the current HTML Element where the interpolation occurs. The element can be an HTML node or a text node.
Usable everywhere.
<div id="target">
  The current node has a nodeType of {{getType($element)}}
</div>
<script>
  var template = soma.template.create(document.getElementById('target'));
  template.scope.getType = function(element) {
    return element.nodeType;
  }
  template.render();
</script>
The $parentElement is a shortcut the parent of an HTML Element. This is useful when called from a text node to send directly the parent.
Usable everywhere.
<div id="target">
  The parent node is a {{getName($parentElement)}}
</div>
<script>
  var template = soma.template.create(document.getElementById('target'));
  template.scope.getName = function(element) {
    return element.nodeName;
  }
  template.render();
</script>
The $scope is the object containing the data that the template is rendered against.
Usable everywhere.
<div id="target">
  A complicated way to find a name: {{getName($scope)}}
</div>
<script>
  var template = soma.template.create(document.getElementById('target'));
  template.scope.name = 'John';
  template.scope.getName = function(sc) {
    return sc.name;
  };
  template.render();
</script>
The $index is the index value of an array repeater item.
Usable only in data repeater nodes.
<div id="target">
  <p data-repeat="item in items">This index is: {{$index}}</p>
</div>
<script>
  var template = soma.template.create(document.getElementById('target'));
  template.scope.items = [1, 2, 3];
  template.render();
</script>
The $key is the key of an object repeater item.
Usable only in data repeater nodes.
<div id="target">
  <p data-repeat="item in items">This key is: {{$key}}</p>
</div>
<script>
  var template = soma.template.create(document.getElementById('target'));
  template.scope.items = {
    'firstname': 1,
    'surname': 2,
    'age': 3,
  };
  template.render();
</script>
The $attribute is the template function instance that represents the HTML node attribute.
Usable only in attribute interpolation.
Helper functions (or values) can be added to the template engine to help format the output. The functions will be added to the global scope that is shared between all templates.
Helper functions make it easy to enhance the template engine's rendering, since they are easily accessible from within the templates. The helpers can be either custom written or imported from other Javascript libraries.
The helpers can be added to the template engine, wrapped in an object and passed to the helpers function. In the following example, the template engine is enhanced with a replaceDash custom function and with more than fifty string functions from the library underscore.string.
<div id="target">
  <p>{{camelize(string1)}}</p>
  <p>{{replaceDash(string1, " ")}}</p>
</div>
<script>
  soma.template.helpers(_.str.exports());
  soma.template.helpers({
    replaceDash: function(value, replacement) {
      return value.replace(/-/g, replacement)
    }
  });
  var template = soma.template.create(document.getElementById('target'));
  template.scope.string1 = "-this-is-a-string-formatted-by-helpers";
  template.render();
</script>
The helpers can be accessed outside of the tokens if needed, either from a call to the helpers function without parameters, or from the global scope.
var camelize = soma.template.helpers().camelize;
var camelize = template.scope._parent.camelize;
For convenience, the helpers can be removed from the template engine, but note that the templates will need to be re-compiled and that it will affect all the templates created.
soma.template.helpers(null);
To provide flexibility, a specific rendering can be intercepted so you can alter it. They are called watchers, and you can watch either a token or an element.
The following example adds a watcher to the date token. The full string date received as a parameter will be formatted to display only the day, the month and the year.
<div id="target">Date formatted: {{date}}</div>
<script>
  template.scope.date = "Wed Nov 14 2012 02:31:20 GMT+0000 (GMT)";
  template.watch('date', function(oldValue, newValue) {
    return newValue.match(/\w{3} \d{2} \d{4}/)[0];
  });
  template.render();
</script>
The following example is watching a div element. For convenience, the template engine will not only watch the token {{color}} in the div but will also watch any token that is a text node and a direct child of the element watched: the token {{content}} in this example.
<div id="target"><div class="{{color}}">{{content}}</div></div>
<script>
  template.scope.color = "color-red";
  template.scope.content = "This text is not red";
  template.watch(template.element.firstChild, function(oldValue, newValue, pattern, scope, node, attribute) {
    if (attribute) return "color-blue";
    else return newValue + " and has been watched as well!";
  });
template.render();
</script>
To remove a watcher, the unwatch function can be used with either a token or an element. Additionally, the function clearWatchers can be used to remove all the watchers at once.
template.unwatch("date");
template.unwatch(element);
template.clearWatchers();
soma-template exposes some settings to customize variables that might be a problem in some configurations. All the settings are applied on the library in a static way, I recommend changing them before creating templates and the changes will affect all created templates.
The settings object can be access this way:
var settings = soma.template.settings;The default double curly braces that surround an identifier {{name}} can be customized. I recommend using at least 2 characters. Some common characters have been tested, but there might be some problems with weird ones!
Two methods can be used to get or set the "start token" and the "end token" characters:
settings.tokens.start("[[");
settings.tokens.end("]]");
<div>[[name]]</div>
Here is a list of attributes (and their default values) that can be changed:
- skip (
data-skip) - repeat (
data-repeat) - src (
data-src) - href (
data-href) - show (
data-show) - hide (
data-hide) - cloak (
data-cloak) - checked (
data-checked) - disabled (
data-disabled) - multiple (
data-multiple) - readonly (
data-readonly) - selected (
data-selected)
These values are just a property on an object, they can be changed this way:
settings.attributes.repeat = "custom-repeat";
settings.attributes.src = "custom-src";
The events such as data-click or other data-mouseover events can also be changed (or added). The events object in soma-template.settings.events contains all the events parsed by the template engine. The keys of the object are the custom node attributes and the values are the DOM events types.
Here is a list of the events handled by the template engine:
- click (
data-click) - dblclick (
data-dblclick) - mousedown (
data-mousedown) - mouseup (
data-mouseup) - mouseover (
data-mouseover) - mouseout (
data-mouseout) - mousemove (
data-mousemove) - mouseenter (
data-mouseenter) - mouseleave (
data-mouseleave) - touchstart (
data-touchstart) - touchend (
data-touchend) - touchmove (
data-touchmove) - touchenter (
data-touchenter) - touchleave (
data-touchleave) - touchcancel (
data-touchcancel) - gesturestart (
data-gesturestart) - gesturechange (
data-gesturechange) - gestureend (
data-gestureend) - keydown (
data-keydown) - keyup (
data-keyup) - focus (
data-focus) - blur (
data-blur) - change (
data-change) - select (
data-select) - selectstart (
data-selectstart) - scroll (
data-scroll) - copy (
data-copy) - cut (
data-cut) - paste (
data-paste) - mousewheel (
data-mousewheel) - keypress (
data-keypress) - error (
data-error) - contextmenu (
data-contextmenu) - input (
data-input) - textinput (
data-textinput) - drag (
data-drag) - dragenter (
data-dragenter) - dragleave (
data-dragleave) - dragover (
data-dragover) - dragend (
data-dragend) - dragstart (
data-dragstart) - dragover (
data-dragover) - drop (
data-drop) - load (
data-load) - submit (
data-submit) - reset (
data-reset) - search (
data-search) - resize (
data-resize) - beforepaste (
data-beforepaste) - beforecut (
data-beforecut) - beforecopy (
data-beforecopy)
soma.template.settings.events['custom-click'] = 'click';
soma.template.settings.events['custom-mouseover'] = 'mouseover';
The variables used the repeaters ($index and $key) can also be changed:
settings.vars.index = "_index";
settings.vars.key = "_key";
Templates can be created side-by-side but also contain each others. The templates can be rendered separately, or all at once using the function soma.template.renderAll().
Here is an example of a template containing another template, with the same tokens but different data:
<div id="template1">
  My name is {{name}} and I can count: {{count}}.
  <div id="template2">
    My name is {{name}} and I can count: {{count}}.
  </div>
</div>
<script>
  var tpl1 = soma.template.create(document.getElementById('template1'));
  tpl1.scope.name = "template 1";
  tpl1.scope.count = 0;
  var tpl2 = soma.template.create(document.getElementById('template2'));
  tpl2.scope.name = "template 2";
  tpl2.scope.count = 0;

  tpl1.render();
  tpl2.render();
  // or
  soma.template.renderAll();
</script>
A reference to a template can be retrieved with the element target of the template, using the function soma.template.get(element).
<div id="target">My name is {{name}}.</div>
<script>
  var target = document.getElementById('target');
  soma.template.create(target);
  var template = soma.template.get(target);
  template.scope.name = "John";
  template.render();
</script>
Templates can be re-compiled using the compile function, which is very close to creating a new template, except that you can keep the same template reference.
Note that re-compiling a template with an element that has been already compiled will not work as the tokens are not in the DOM anymore. To achieve this, a cache of the element can be stored before creating the template.
<button id="render">render</button>
<button id="compile">compile</button>
<div id="target">My name is {{name}}.</div>
<script>
  var target = document.getElementById('target');
  var targetCache = target.innerHTML;
  var template = soma.template.create(target);
  $('#render').click(function() {
    template.scope.name = "John";
    template.render();
  });
  $('#compile').click(function() {
    template.element.innerHTML = targetCache;
    template.compile();
  });
</script>
Updating the data but not rendering the template is possible using the update method.
template.scope.name = "John";
template.update();
The template engine rely on data change to update the nodes and attributes. If the values of the tokens do not change, the DOM will not be updated. The reason is to keep the performance high and change only what is necessary. You can however "invalidate" the data and force a DOM update using the template function "invalidate".
This is not recommended! Data can be sent straight into the template without using the scope. An object can be sent as a parameter in the update or render functions.
This method is not recommended because the template engine is meant to work with existing scopes. This will force the template engine to iterate the object and assign the properties to the existing scopes, which will be significantly slower than using the scope. Assigning an object, even a very big object, on an existing scope (scope.big = bigObject) is the right way to use the template engine.
Disposing of something that fill the memory is always a good idea, even a small object. To dispose a template, the dispose function can be called, this will destroy everything that has been created internally by the template engine.
template.dispose();
template = null;
The template engine is going through several steps at compile-time, and render-time
The compile-time process is what is happening inside the template engine when it is created. The template instance will keep a reference to the element root and start to parse the DOM to create instances of internal functions to mimic and represent the DOM structure of the current template.
A scope is created on the first node and passed to the others. The internal function instances created are of the type of Node, Attribute, Interpolation and Expression.
A Node instance represents a DOM element, an Attribute instance represents an attribute of an element, an Interpolation instance represents a sequence containing strings and expressions, and finally an Expression instance represents a token.
The template instance keeps and exposes the reference of the root node and the root scope, which are accessible using the template property node and scope respectively.
A node can contain attributes (or value if it is a Text Node), and can contain other children. Both the nodes and attributes can contain interpolations, and each interpolation can contain a list of expressions (token). In other words, the template instance can be browsed and inspected from the root to its extreme nodes, exposing tokens on the way. The structure has been exposed if some actions have to be made before rendering.
The template will start two processes, one after the other. The first step is to update the expressions values using the scope data, invalidating the nodes and attributes if the values have changed. And the second step is parsing its nodes and attributes to update the DOM if necessary.
All nodes created by the template engine are accessible and it is possible to update and render a single node (and its children), without having to render the whole template.
For convenience, the template and each node provide a getNode function to quickly access to a specific node if needed. Here is an example to render a specific node without rendering the whole template:
<div id="target">
  <p>Only the second paragraph is rendered:</p>
  <p>First paragraph: {{content1}}</p>
  <p id="second">Second paragraph: {{content2}}</p>
</div>
<script>
  var template = soma.template.create(document.getElementById('target'));
  template.scope.content1 = "first content";
  template.scope.content2 = "second content";
  var node = template.getNode(document.getElementById('second'));
  node.update();
  node.render();
</script>
The nodes can also be accessed this way:
var node = template.node.children[0].children[0];As the nodes, the attributes can also be accessed and rendered without rendering the whole template.
For convenience, each node provide a getAttribute function to quickly access to a specific attribute if needed. In the following example, only the class attribute will be rendered:
<div id="target">
  <p class="{{color}}">Only the class attribute is rendered {{content}}.</p>
</div>
<script>
  template.scope.color = "color";
  template.scope.content = "text not rendered";
  var attribute = template.node.children[0].getAttribute("class");
  attribute.update();
  attribute.render();
</script>
The attributes can also be accessed this way:
var attribute = template.node.attributes[0];The demos source code are available on the github repo.
soma-template has been tested on all modern browsers and on Internet Explorer from version 7 to 10, but if you find something that doesn't work or want to discussed something, please use Github issues.
I don't have to talk about all these people and great tools that helped me, but not only it is fair, I also think that some details might help other developers to change or improve their workflow if needed. So here it is!
The library probably wouldn't have been created without the fully featured framework developed by Google: AngularJS. While the code itself has nothing to do with AngularJS, the concept has been greatly inspired by its template system and some similarities can be found. The library has been kept to a minimum to do a single job: update the DOM with content.
The primary goal is to use the native DOM API, with a minimal destruction of the nodes. I also believe, as other developers, that DOM-based template engines are the future and will probably be one day be implemented in the browser itself. Google is probably working on that already as stated in this excellent post by Steven Sanderson.
So, big thanks to the AngularJS team for a great inspiration, at least to me.
Also, very big thanks to the developers who helped me. Magnus Dahlstrand for his invaluable advices, and Arpad Ray for his regular expressions magic!
Jasmine is amazing, it is a behavior-driven development framework to test javascript code. Really easy to work with to run your unit tests.
Browserstack is a great tool to check your content on different browsers and os. They also have an API to create workers to connect to. I check my Jasmine tests against their API and check visual features in their online tool.
pagekite is a great tunneling solution. It basically makes you able to see your local development server from anywhere. I use their services to send the Jasmine tests to Browserstack. Seamless, easy and really working well, great tool.
Bunyip is a javascript library that connects everything, so you can run your tests locally. It connects you to the Browserstack API (or local browsers), using pagekite so Browserstack can access to your local server, and internally using Yeti (Yahoo) to get the Jasmines tests output back to your command line (yes it does all that).
grunt.js to concatenate scripts, compress Javascript, generate files or do anything with all the plugins that are already built.
Testacular is great to have the Jasmine tests checked at all time while I develop, on files change and in multiple browsers. Hassle free and very easy.
And along the way, Webstorm is the best javascript editor (imho of course). It is not only makes my like easier but also provides all the tools I need so I can refactor the code and run the tests while staying in the IDE.